
Step 1 -
Turn on shelf lights
Navigate to ‘Lights’ and turn ON your Top, Middle, and Bottom Shelf lights. This will also activate the fans.
Step 2 -
Move successful seedlings up to shelves
Selecting the best seedlings, fill all the spaces in your Farmshelf’s three shelves.
** Remember to turn OFF your nursery on the touchscreen and clean for your next round. Best practice: Do not use soaps or bleaches to clean. Hydrogen peroxide diluted solutions are the best and safest cleaning tool. FInd out more in the ‘Cleaning’ Tab.
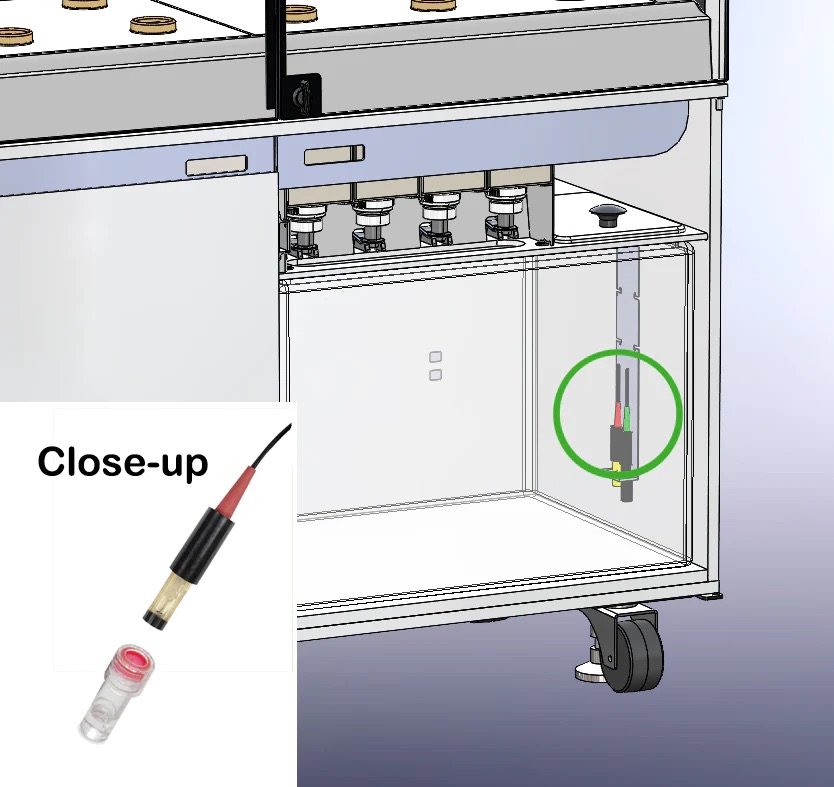
Step 3 -
Remove the pH probe Cap
Before your first watering, remove the pH probe cap located on the pH probe in your water tank. (image left) this will not need to be adjusted again.
These sensors help to operate the automation of dosing nutrients to your plants. Often, the pH and EC will fluctuate depending on the hardness of your water locally. You also want to be sure your tank if filled over 45% at all times, not only for circulation of water but to be sure your plants get the nutrients they need. The auto-doser will stop dosing if there isn’t enough water to dilute the solution. Watering to the top once a week should be plenty!
⚠️ Your Farmshelf will need to be watered regularly. We encourage your Farmshelf to be above 40% at all times to receive the nutrients and fresh water for the best success.
Step 4 -
Fill the water tank: Water Cart
The three methods for watering are: Water Cart, Watering Hose and Municipal. Please find the method applicable to you.

Step 4:
Fill the water tank: Watering Hose

🌱 This option includes a sink diverter, which is mounted directly to the faucet.
🌱 The sink diverter can be connected to a faucet with a standard 55/64” male thread by removing the existing female aerator (no adapter is needed).
Unique thread sizes will require an adapter kit that will allow you to mount the sink diverter to any faucet.
Step 4:
Fill the water tank - Municipal
Two ¾” NPT threaded fittings on rear of unit (one fill, one drain)
Water should be 20-26 °C (68-78 °F)
🌱 Select ‘Water Flow’, tap the drop-down ‘Manual Fill’, then tap the ‘Fill’ button.
Your touchscreen will provide further instructions.
🌱 Note the TOP port is to DRAIN, the BOTTOM port is to be detached for FILL. (image left)
🌱 When prompted by the touchscreen, disconnect the tank hose from bottom port (see photo), and connect your cart's quick connect fill hose.
🌱 When finished, disconnect your cart's fill hose, reconnect the tank hose, and close the water door/hatch.
🌱 Note: It is important to fill to the top each week. Water flow can be compromised without enough water.
**Note: You should not leave your Farmshelf unattended while watering. Your Farmshelf will notify you once completed.
Fill Procedure:
🌱 Connect one end of the hose to the sink diverter and the other end to the fill port in the front of the unit.
🌱 Turn on the faucet to pressurize the hose.
🌱 Follow the standard manual fill procedure via the touchscreen.
Drain Procedure:
🌱 Connect one end of the hose to the drain port in the front of the unit (the top port, above the fill port) and place the other end loosely in the sink.
🌱 Follow the standard manual drain procedure via the touchscreen.
**Note: You should not leave your Farmshelf unattended while watering. Your Farmshelf will notify you once completed.
Initiate Water Fill once a week
💧Navigate to ‘Water Flow’ on your touchscreen
💧Select ‘Municipal Fill’ and ‘Fill tank’
💧Allow water to fill.
**Note: You should not leave your Farmshelf unattended while watering. Your Farmshelf will notify you once completed.
Step 5:
Add your Nutrients

The forks should lay under the nozzle.
(image above)
🌱 The Farmshelf automatically adds nutrients and buffers to the water. Just swap in fresh cartridges that will come in your subscription box.
🌱 Before inserting cartridges into Farmshelf, remove the protective cap from each of the four cartridges.
🌱 Open the bottom right hatch (access panel) on your Farmshelf.
🌱 Insert cartridges in left to right order: Nutrient A, Nutrient B, Buffer Up, Buffer Down (as illustrated above).
Step 6:
Turn ON functions
and Monitor
Turn ON via the touchscreen ‘Water Circulation’ and ‘Auto-doser’
Return to your Farmshelf once a week for regular maintenance: watering and partial harvests.
Partial Harvest Instructions for your specific crop can be found on the Crop Guide - this link also lives in your seed order, sent per shipment.
You should not turn OFF any functions during the crop cycle. With the exception of the Nursery (when not in use).
Pro Tips
Know your UNIT ID
Our support team can review your Farmshelf’s data. Email the first 3 characters of your UNIT ID located on the touch screen of the Farmshelf.

Understanding the timeline for your crop cycle is essential:
1. Nursery duration (14 days)
2. Partial Harvests (up to 3 per crop cycle)
3. Crop Cycle (8-10 weeks)
4. Next order (week 6 to receive week 7)
Watering regularly - Water level sensors live in the Farmshelf. Should a Farmshelf not have enough water…. your plants won’t receive nutrients, water and live in stagnant rather than circulating water.
Save our Website!
You’ll return to order every 6-7 weeks. BOOKMARK US 💚
Nursery water and Shelf water are two different systems. You can clean the shelves while growing in the nursery!
Learning how to Harvest will help your plants to grow bigger!
Learn all the types of harvesting on the Crop Guide!
Have any questions?
Email Support@farmshelf.com or chat with our chatbot


